
Create an i-Pad Inspired Bookshelf Using Photoshop
Often when I need to learn how to do something, I use the web and the wealth of tutorials that are available. However, not very often, there will be a tutorial that is both timely, and very good.
Unfortunately, this is the web, and websites can come and go with actions as simple as moving your web site to another location, or folding your hosting account.
Such was the case for this magnificent tutorial "Create an i-Pad Inspired Bookshelf Using Photoshop" (30 June 2010, Eren Göksel, http://www.psawesome.com/tutorials/create-an-i-pad-inspired-bookshelf-us...) which mysteriously dissappeared rather recently. Needing to recall this information I searched feverishly to find how to recover this tutorial.
Thanks to a Google search cached page and thanks to a Chinese version of that tutorial (and Google Translate) found here (http://yangjia91.blog.163.com/blog/static/6596721201011104415965/). I have scrapped together this tutorial, and I am glad to revive it here.
So please enjoy. The tutorial below is recreated to the best of my ability. Thanks to Eren Göksel for creating this and making me wiser in creating bookshelves.
This process is used in MAC OS, so the shortcuts are not the same, For Windows users, please replace the Command key with the Control key (Ctrl)
Hey, after a while i’m back with a drawing tutorial. In this Awesome* Photoshop tutorial i’m going to show you how to create an i-Pad inspired bookshelf illustration. Through out this tutorial you’ll learn how to create a basic wood texture, create a bookshelf and put some books in. Have fun.
Here is the Final Image
Before we start lets see the final image we'll create through out this tutorial.
 (detail)")
1. Create a New Document
Letís start by creating a new document which is 768 x 1030 pixels at a resolution of 300 pixels/inch, make sure Color Mode is set to RGB.
 (detail)")
2. Simple Wood Texture
Create a new layer named "Back". Fill it with any color. Set Foreground Color to #e0ad5e and Background Color to #eec375. Go to Filter > Render > Fibers. Set Varience to 15 and Strength to 25. Then go to Filter > Blur > Motion Blur, set Angle to 90 and Distance to 100 pixels.
 (detail)")
3. Simple Wood Texture
Hit Command+T and set Reference Point Location to middle left. Set Horizontal Scale (W) to 50 and apply. Duplicate the "Back" layer and drag and place the copy in the right half of the canvas. Hit Command+E to merge the both Back layers.
 (detail)")
4. Simple Wood Texture
Go to Filter > Liquify. Get the Turbulence Tool and under Tool Options, use these settings: Brush Size => 60, Brush Density => 100, Brush Pressure => 70, Brush Rate => 100 and Turbulent Jitter => 100. Drag 3 to 5 vertical lines slowly with a shaky hand to enhance the wood texture.
 (detail)")
5. Depth
Now apply an Inner Shadow Layer Style using these settings: Blend Mode => Linear Burn, Color => Black, Opacity => 70%, Distance => 0 and Size => 250.
 (detail)")
6. Add Some Guides
Get The Rectangular Marquee Tool, set Style to Fixed Size, set Height to 64 px and make a selection like in the below image. Drag a Horizontal guide and snap it to the selection as in the below image.
 (detail)")
7. Create The Top
We’ll make another rectangular selection. This time set Width to 128 px and Height to 768 px and place the selection anywhere in the canvas like in the below image. Select "Back" layer in the Layers Panel, hit Command+C to copy, then Command+V to paste the selection into a new layer. Name the new layer "Top". Hit Command+T, rotate it 90 degrees and place it at the top of the canvas as in the below image.
 (detail)")
8. Create The Top
Create a new layer on top. Get the Line Tool, set Mode to Fill Pixels, set Weight to 1 px. Set Foreground Color to #c9984d. Holding down the Shift key draw 14 horizontal lines as in the below image. Go to Filter > Liquify. Pick the Twirl Clockwise Tool and under Tool Options use these settings: Brush Size=> 130, Brush Density => 50, Brush Pressure => 15 and Brush Rate => 80. Drag over the lines slowly from left to right and right to left with a slowly shaking hand. You can undo and try again. When you’re happy with the result hit OK. Hit Command+E to merge "Layer 1" and "Top" layers.
 (detail)")
9. Create The Top
Go to Filter > Noise > Add Noise, set Amount to 2% and hit OK. Hit Command+T and scale the "Top" layer down as in the below image. Then Apply a Gradient Overlay Layer Style and use these settings: Blend Mode => Soft Light, Opacity => 50%, Gradient => Black, White, Style => Linear and Angle => 90 degrees.
 (detail)")
10. Add Some Shadow
Command-click the "Top" Layer Thumbnail to load the selection. Create a new layer below the "Top" layer and name it "Top Shadow". Fill the selection with color #552200. Now deselect by hitting Command+D, then go to Filter > Blur > Gaussian Blur and apply with a Radius of 40 pixels. Get the Move Tool and move the shadow 40 pixels down.
 (detail)")
11. Some More Guides
Get the Rectangular Marquee Tool, make sure Style is set to Fixed Size and set Width to 20px and Height to 177 px. Place the selection at the left edge of the canvas first as in the below image, drag one horizontal and one vertical guide and snap them around the selection. then drag the selection to the right edge of the canvas and drag one vertical guide and snap it to the left edge of the selection, then deselect.
 (detail)")
12. Create The Sides
Create a new layer above the "Back" layer and name it "Sides". Now make selections as in the below image (you need to set the Style to Normal first) and fill them with Color #552200 and deselect. Set Layer Opacity to 70% and Blend Mode to Multiply.
 (detail)")
13. Enhance Corners
Create a new layer above the "Sides" layer and name it "Side Corners". Get the Line Tool, set Mode to Fill Pixels, set Weight to 2 pixels and draw two black lines along the vertical guides. I hided the guides so that you can see the lines. Then apply a Gaussian Blur filter with a Radius of 1.5 pixels.
 (detail)")
14. Create the Shelves
Get the Rectangular Marquee Tool, set Style to Fixed Size, set Width to 768px and Height to 14 px. Make a selection like in the below image. Select "Top" layer in the Layers Panel and hit Command+C to copy. Hit Command+V to paste the selection into a new layer and name it "Shelf 1". Get the Move Tool and drag it down and snap to the guide as in the below image.
 (detail)")
15. Create the Shelf Shadow
Select the "Top Shadow" layer in the Layers Panel. Setting the Style to Normal, make a rectangular selection as in the below image and hit Command+C to copy. Hit Command+V to paste the selection into a new layer. Name the layer "Shelf Shadow" and drag it on the canvas and place it below the shelf as shown below.
 (detail)")
16. Create the Shelf Top
Get the Rectangular Marquee Tool, set Style to Fixed Size again and set Height to 10 pixels. Click on the canvas to make a selection, move the cursor inside it, drag and place it just above the shelf. Then drag and snap a horizontal guide to the upper edge of the selection. Now set Style back to Normal, select the "Top" layer in the Layers Panel and make a selection as in the below image which is approximately half high of the top part. Copy and paste the selection into a new layer and name the layer "Shelf Top". Hit Commad+T and place it just above the shelf and scale it down as shown below.
 (detail)")
17. Create the Shelf Top
Now hit Command+L to bring up the Levels dialog, set Shadow Input Level to 50 and hit OK. Hit Command+U and set Saturation to -15 and Lightness to -5. Then apply a Gradient Overlay using these settings: Blend Mode => Linear Burn, Opacity => 10%, Gradient => Black, White, => Reverse => Checked, Style => Linear and Angle => 90 degrees. Now go to Edit > Transform > Perspective, drag the top left corner inside, over the guideline as in the below image.
 (detail)")
18. Create the Shelf Top
Again! set Style to Fixed Size, this time set Height to 194 pixels. Make a selection and place it as in the below image. Drag one Horizontal guide and snap it to the bottom of the selection. Now deselect. Go to Layers Panel, select "Shelf 1", "Shelf Top" and "Shelf Shadow" layers and hit Command+E to merge them.
 (detail)")
19. More Shelves
Duplicate the "Shelf 1" layer and name it "Shelf 2". Drag and place it as in the below image. Make another rectangular selection that is 194 pixels high as shown below and drag another guide and snap to the bottom of the selection, then deselect .
 (detail)")
20. More Shelves
Repeat the previous step two more times to create the rest of the shelves.
 (detail)")
21. Enhance The Edges
Create a new layer on top and name it "Shelf Shadows". Get the Line Tool, set Weight to 1 px and draw canvas wide black lines where shelves connect to the back of the bookshelf. Then go to Filter > Blur > Gaussian Blur and apply with a Radius of 2 pixels.
 (detail)")
22. Enhance The Edges
Now we’ll clear the exceeding parts of these lines. Command-click the "Sides" Layer Thumbnail to load the selection. Then Command+Alt-click each Shelf Layer Thumbnail to substract them from the selection. Hit Backspace to clear the selection, then deselect.
 (detail)")
23. Add Some Detail
Create a new layer above the "Back" layer and name it "Parts". Hit D on the keyboard to set to default colors. Go to Filter > Render > Clouds. Go to Filter > Pixelate > Mosaic and set Cell Size to 100. Then Go to Filter > Blur > Motion Blur, set Angle to 90 degrees and Distance to 999 pixels. Hit Command+F three times to repeat the filter.
 (detail)")
24. Add Some Detail
Set Layer Blend Mode to Overlay. Command-click the "Sides layer, hit Backspace to clear the selection and deselect.
 (detail)")
25. Make Room
Go to Image > Canvas Size. Check Relative and set Width to 28 pixels and hit OK. This will give you extra 14 pixels on each side of the canvas.
 (detail)")
26. Create The Sides
Select the "Top" layer in the Layers Panel. Get the Rectangular Marquee Tool, set Style to Normal and make a selection as in the below image. Copy and paste the selection into a new layer, then deselect. Hit Command+T, rotate it 90 degrees, place it on the empty area on the left and scale to fit. Duplicate the layer and place the copy on the right edge.
 (detail)")
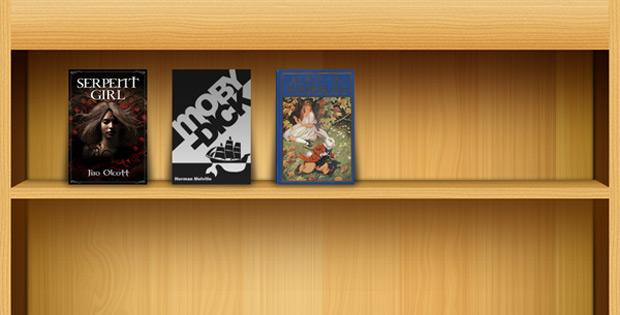
27. Place Some Books
Now it’s time to put some books in it. Bring the book cover image into your document and place the layer on top, scale it down and place it on the top shelf. Create a new layer below the book, get the Polygonal Lasso Tool and make a selection as in the below image. Fill it with Black. Deselect and apply a Gaussian Blur filter with a Radius of 4 pixels. Set Layer Opacity to 70%.
 (detail)")
Congratulations
I place two more books and this is my final image. I hope you liked this tutorial and had fun making it.
- Vinny's blog
- Log in to post comments